Demystifying Projector Technology: Understanding Keystone Correction
Introduction
Projector technology might seem intricate for some, especially when we dive into features like keystone correction. But it doesn't have to be. This article offers a user-friendly guide to understanding what exactly 'keystone' means on a projector, why it is essential, and how to adjust it optimally to enhance your viewing experience. Let's demystify projector technology and make your viewing sessions a delight!
What Exactly is Keystone on a Projector?
'Keystone' in reference to a projector can be a bit of a puzzling term, especially if you're not a tech enthusiast. Don’t worry if you're confused - we've got you covered!
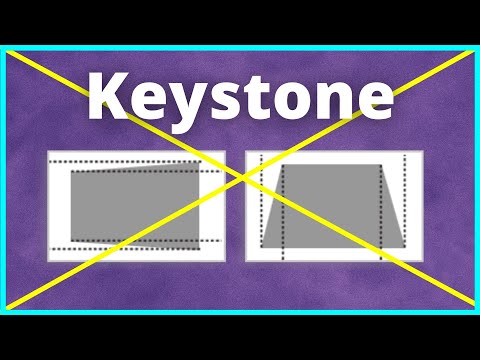
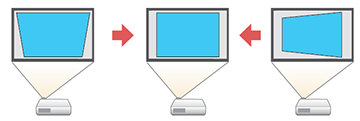
- Understanding 'Keystone': The 'keystone' feature in projectors is designed to eliminate distortions in projected images. To put it simply, it maintains the rectangular shape of an image, irrespective of how the projector is angled towards the screen or surface.
- The Reason Behind the Name: The term 'keystone' comes from the shape of the distorted image without correction, which often resembles an architectural wedge or keystone used in arches and bridges.

- The Magic of Transformation: Keystone correction manipulates the image's dimensions until it visually meshes with its original rectangular shape. Remember, it doesn't alter the content of the image; it just ensures that the image stays properly proportioned, no matter which angle it's being projected from.
Once you understand this feature, you'll be able to significantly enhance your viewing experience, whether you're organizing a business presentation, setting up a home theatre, or anything else that involves a projector.
Why is Keystone Correction Important for a Projector?
Keystone correction in a projector is essential due to several reasons. It improves the viewing experience and maintains the quality of the projected content by ensuring the image retains its intended rectangular shape. Let's delve deeper into why Keystone Correction is so vital:
• Accurate Display: Keystone correction is crucial for maintaining the authenticity of the projected image. In the absence of this feature, the projected image would end up distorted, stretched, or skewed, which significantly ruins the quality of the display.
• Versatility: Irrespective of where you're setting up your projector - either for a business presentation or a home cinema, keystone correction ensures an optimal viewing experience. With keystone correction, you don't need a perfect perpendicular angle between the projector and the screen.
• Rectangular Shape Consistency: Keystone correction allows projected images to stay in their desired rectangular shape, irrespective of the projection angles. This is important as it prevents the distortion of the image, which could render it meaningless.
• Enhanced Viewing Experience: In addition to avoiding distortion, keystone correction allows you to view the image in true proportion, creating a better visual experience. It means even when the projector is tilted up or down, the image quality remains uncompromised.
In conclusion, keystone correction is an invaluable feature in projectors that helps overcome viewing issues when the setup isn't ideal. It's an essential factor in ensuring your projector can handle a wide range of setup environments, while consistently delivering a high-quality viewing experience.
Vertical Vs. Horizontal Keystone Adjustment - What's the Difference?
Keystone distortions in images come in two primary forms: vertical and horizontal. Both have different effects, causes, and methods of adjustments. Here, we'll help you differentiate between these two types of distortions.
1. Vertical Keystone Distortion:
Vertical keystone distortion takes place when a projector is angled either too high or too low compared to the screen. Engaging the keystone correction for a vertical distortion yields these key effects:
- *Problem:* This tilt makes the image appear elongated vertically, distorting its proportions.
- *Solution:* Vertical keystone adjustment ensures the image retains its rectangular shape, correcting any elongation effect.

- *Usage:* This adjustment is generally most applicable in settings where the projector is placed on a lower or higher surface, such as a table or ceiling mount.
2. Horizontal Keystone Distortion:
Horizontal keystone distortion occurs when the projector is off to the side of the screen or surface it's projecting onto. Recognize horizontal keystone distortions and learn how to manage them:
- *Problem:* This sideward position leads the image to appear skewed horizontally.
- *Solution:* Horizontal keystone adjustment counteracts this, making the image more symmetrical and rectangular.
- *Usage:* While less common than vertical distortions, this adjustment is helpful when the projector needs to be offset from the centerline of the screen due to space constraints.
While vertical keystone adjustment is more widely used due to commonplace projector placements, modern projectors often include both vertical and horizontal adjustment options for increased flexibility. Consequently, understanding their differences and how to handle them is an essential component of optimizing your projector usage.
How Does Keystone Distortion Affect Your Viewing Experience?
The viewing experience of any presentation or movie projection ought to be seamless and enjoyable. The presence of keystone distortion, however, can mar this experience in varying degrees. To understand how this distortion can affect your viewing seamless, let's explore its key impacts:
1. Image Warping: Unaddressed keystone distortion results in a skewed projection. The resulting image could appear vertically stretched if the distortion is vertical, or horizontally slanted if it's horizontal. This warping detracts from the overall viewing experience, making the content challenging to engage with.
2. Poor Content Detail: Keystone distortion significantly affects the clarity of detailed images or texts. This may result in crucial details becoming practically unreadable or unidentifiable. In a business presentation or an education setting, these details might be essential for comprehension and learning.
3. Viewer Discomfort: Prolonged exposure to distorted images can exert undue strain on the viewer's eyes. Over time, this might prompt headaches and general discomfort during extended viewing sessions, rendering the experience far from enjoyable.
4. Reduced Image Quality: Keystone distortion not only affects the shape of the image but also its quality. The corrections made to rectify the distortion might lead to a compromised image resolution, causing pixelation or blurring of the image.
By identifying and addressing keystone distortions accurately, viewers can ensure that their viewing experience remains optimal. Successful mitigation of these issues promotes a clear, undistorted, and high-resolution projection, translating to a genuinely satisfying viewing session.
How to Optimally Adjust Keystone on Your Projector?
Generally, refining the keystone on your projector is a straightforward procedure. Here's a step-by-step guide to help you optimally correct your projector's image:
1. Locate the Keystone Setting: Typically, you'd have to access the projector's menu using the menu button present on the device or remote control. Look for a setting named 'Keystone,' 'Keystone Correction', or something similar depending on the brand and model of your projector.
2. Vertical Keystone Adjustment: If the image appears skewed vertically - narrower at the top or bottom - it indicates a vertical keystone distortion. Use the up and down arrow keys to correct the tilt and bring the image back to a rectangular shape.
3. Horizontal Keystone Adjustment: If the image is distorted horizontally - narrower on one side compared to the other - it suggests a horizontal keystone issue. You'll need to use the left and right arrow keys to readjust the image.
4. Automatic Keystone Adjustment: Some modern projectors are equipped with an automatic keystone correction feature. This means they automatically identify distortions and correct them accordingly. If your projector has such a feature, enable it for an effortless correction process.
5. Manual Fine-tuning: Once your projector has completed automatic adjustment, you might notice some minor discrepancies. Use manual adjustments for fine-tuning.
Remember, while keystone correction is helpful, the best practice is to initially set up your projector as perpendicular to the screen as possible. Relying solely on keystone correction to perfect the image can lead to a reduction in image resolution and size. It's best to use this feature to eliminate minor distortions for an optimal viewing experience.
Conclusion
Projector technology, especially keystone correction, can seem quite complex, but once understood, they are invaluable tools. Keystone correction aids in quality projection and creates a visual impact, ensuring that your viewing experience remains optimal. Now that you understand its significance and the process of adjusting it, you're one step closer to mastering your projector tech.
Related FAQs about what is keystone on projector
How does a projector's keystone feature influence the image quality?
A projector's keystone feature adjusts the projected image's shape to rectify any distortions caused by non-perpendicular angles between the projector and screen. While this maintains image proportionality, excessive keystone correction can cause a slight reduction in the overall image resolution.
What are the common problems associated with incorrect keystone settings?
Incorrect keystone settings can lead to distorted projections, causing the image to appear vertically stretched or horizontally skewed. It complicates reading text, recognizing detailed images, and impacts viewer comfort by triggering undue strain on the eyes. In extreme cases, it leads to pixelation or blurring.
Manual vs. Automatic Keystone Correction - Which one is better?
Automatic keystone correction offers a convenient, user-friendly experience. However, it might not be as accurate as manual correction in certain instances. Manual adjustment allows for precise fine-tuning, ensuring an optimal viewing experience. It's advisable to use a combination of both for best results.


