Understanding Projector Technology: A Comprehensive Guide to Projector Offset
Introduction
Projectors play a vital role in a variety of settings - from home theaters and business meetings to classrooms and large events. The performance of a projector is influenced by various factors, with 'projector offset' being a crucial one. It may sound like a complex concept, but understanding projector offset can greatly enhance your projector use. But what is projector offset? Why is it important? And how can it impact the viewing experience? This comprehensive guide will take you through all these questions while providing valuable tips on adjusting and calculating projector offset to enhance your viewing experience.
What Is Projector Offset and Why Is It Important?
The mention of 'projector offset' often leaves people perplexed; however, it's a fundamental element of projector technology. Projector offset refers to the position of a projector's lens compared to the projected image. This concept often gets misunderstood, so let's break it down:
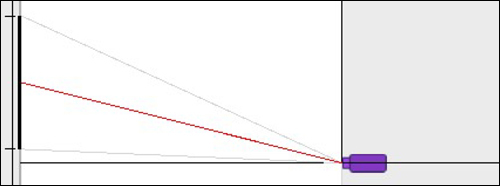
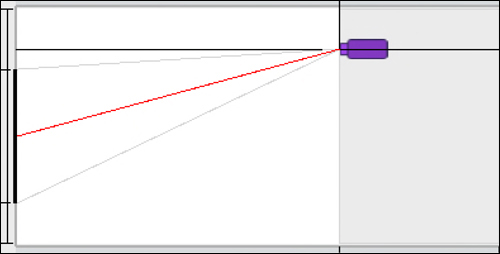
- Definition: Explained as a percentage, the offset is the relationship between the center of the projector's lens and the projected image. This could be 100% offset where the bottom edge of the image aligns with the lens center, or 0% offset where the center of the image and lens coincide.
- Calculating Offset: This often demystified concept is nothing but a simple projection geometry. For example, if your projector's lens center is 4 inches above the bottom of a 50-inch image, its offset is (4/50)*100 = 8%.
- Significance: The importance of projector offset lies in ensuring correct image alignment onto the screen. It plays a pivotal role in determining the precise positioning of the projector in correlation with the screen.
The key takeaway here is grasping the concept of projector offset to enhance the positioning and configuration of your projector setup, which significantly contributes to improving the projection quality. Get it right, and you can unlock the full potential of your projector system.
How Does Projector Offset Impact the Viewing Experience?
Understanding the impact of projector offset on the viewing experience can help optimize your projector setup for a more enjoyable and immersive view. Here’s how a projector offset affects your viewing:
1) Throw Ratio and Image Size: The offset directly influences the projector's throw ratio, which is the relationship between the distance from the projector to the screen and the width of the image produced. Understanding this relationship can help you achieve the ideal image size for your specific setup.
2) Projection Quality: The quality of the projector images is also determined by the offset. A properly calibrated offset ensures that the projection accurately aligns with the screen. This greatly enhances the clarity and sharpness of the image, ensuring an optimal viewing experience.

3) Prevention of Keystone Effect: Incorrect projector placement caused by miscalculations in offset can result in a keystone effect, where the projected image takes the shape of a trapezoid instead of a rectangle. Correct offset alignment helps to prevent distortions like this.
4) Image Placement: The position of the projected image can make-or-break your viewing experience. A high offset projects the image higher above, which may cause distortion unless adjusted. A low offset projects the image lower and may require the projector to be elevated for ideal viewing.
Remember, albeit a technical feature, mastering projector offset provides you with total control over your viewing experiences, enabling sharper, clearer, and distortion-free images.
What Are the Different Types of Projector Offsets and How to Calculate Them?
In the realm of projector technology, offsets come in three primary varieties. Each type has specific characteristics and a unique setup approach. Comprehending these categories will undoubtedly aid in achieving a more optimized and tailored viewing experience.
1. Positive Offset: This offset type occurs when the baseline of the projected image lies above the center of the projector's lens. Such a setup is quite common, making it crucial for projector users to understand and correctly configure.
2. Zero Offset: Here, the lens's center aligns directly with the center of the projected image. This configuration is typically utilized in scenarios requiring direct projection with no disparity between lens and image.
3. Negative Offset: Quite a rare occurrence; in this case, the baseline of the image is below the projector lens's center. Owing to its rarity, specific scenarios call for this configuration.
Each of these offset types can be calculated using an uncomplicated ratio of up-distance (the distance from the lens center to the bottom of the image) to image height. This calculation is traditionally represented as a percentage. To exemplify, consider a projector where the lens center sits five inches above a 60-inch image's bottom. For this given setting, to calculate the offset, one would use the formula (5/60)*100, resulting in an offset of approximately 8.33%.
To summarize:
- Positive Offset: Image baseline above lens center.
- Zero Offset: Lens center aligns with the image's center.
- Negative Offset: Image baseline below lens center.
Understanding these offset types and their respective calculations allows for adapting your projector setup effectively and accurately. By adjusting the offset, you can achieve the best possible projection performance compatible with both your device and your environment.
How to Adjust Your Projector's Offset for the Optimal Viewing Experience?
Adjusting your projector's offset is a process that demands accuracy to achieve the desired projection alignment on the screen. Here are the key steps to follow:
- Identify the Projector's Designed Offset: The first step in adjusting the projector’s offset is to comprehend its designed offset. The design offset is usually specified by the manufacturer and gives you a starting point for positioning your projector.
- Position the Projector Accordingly: If your projector has, for instance, a 100% offset, it means the bottom of the image lines up with the lens center. So, the projector needs to be positioned at the base of the screen.
- Utilize Tilt Mechanisms for Minor Adjustments: Use the projector's tilt mechanisms for slight adjustments. Be wary of excessive tilting though, as it can lead to undesirable distortions like image keystoning.
- Leverage Adjustable Mounts for Projectors without a Lens Shift Feature: In case your projector lacks a lens shift feature, you might need to rely on adjustable mounts or stands for proper alignment.
- Refer to the Manufacturer’s Guide: Always refer to the manufacturer’s guide for specific instructions. It can provide further nuances in settings and projector placements.
Remember, the whole idea behind adjusting the projector offset is to align your projected image accurately with your screen. This not only improves the viewing experience but also deters potential damage to the projector due to excessive tilting.
Why The Correct Projector Offset Enhances Your Images?
A correctly calculated and adjusted projector offset can greatly enhance the quality of your projected images. This is achieved through the following benefits:
1. Elimination of Distortion: An incorrect offset may cause your image to become distorted or skewed. This issue, known as 'keystoning,' is avoided when the projector offset is properly set and aligned.
2. Better Pixel Utilization: Proper projector offset aids in full utilization of the projector's pixels. When the offset is incorrect, some parts of the image may lack clarity, negatively impacting the overall visual experience.
3. Superior Image Sharpness: The sharpness of the image improves significantly with a correct projector offset. A properly aligned projector offset ensures that the image is projected accurately onto the screen providing sharper, clearer visuals.

4. Proportionate Display: Projector offset also controls the size and proportions of the image. An accurately set offset ensures that the image is not disproportionately larger or smaller than intended, resulting in a more appropriate display for the viewer.
In conclusion, understanding the core principles of projector offset and taking the necessary steps to correctly align it are vital for maximizing the quality of the projected image. Calendar reminders for routine offset adjustments can help maintain a consistently high-quality viewing experience. When correctly executed, proper projector offset can dramatically enhance the clarity, sharpness, and proportion of your projections, taking your visual experiences to the next level.
Conclusion
Understanding projector offset is fundamental in achieving an optimal viewing experience. Its impact extends from projector placement, image size, quality, and alignment, to screen installation. By understanding the concept, how to calculate it, and how to adjust it, you can optimally calibrate your projector to deliver high-quality, clear, proportionate, and distortion-free images. Always remember, the undervalued measure – projector offset – has the potential to significantly enhance your visual experience.
Related FAQs about what is projector offset
What does the offset ratio tell you about a projector?
The offset ratio provides information about the projector's lens position relative to the projected image. It's essential in projector setup, informing the height placement of the projector in relation to the screen to avoid image distortion and ensure optimal viewing.
How does ceiling mounting affect projector offset?
Ceiling mounting inversely affects the projector's offset. The projector is flipped, and hence the offset is reversed. For example, a 100% offset will mean the top of the image is in line with the projector lens. Correct calculation is critical for accurate picture placement.
How to choose a projector based on its offset?
When choosing a projector based on its offset, consider the room's layout where it will be used. If you need the projector for a home theater setup where viewers may walk in front of the projector, a high offset will be preferable. Conversely, for a small room or low ceiling, a low or zero offset projector will be suitable.


