Essential Photography Knowledge: Understanding What is Aperture on a Camera
Introduction
In photography, mastering the concept and usage of the aperture can significantly enhance your images' quality and impact. Apart from learning exposure, understanding how the aperture works will allow you to manipulate the photo's depth and focus, leading to more exciting compositions. In this article, we're going to delve into the basics of apertures, how they affect exposure, and the depth of field in photos. You'll also get practical tips on choosing the right aperture setting for your desired outcome.
What Exactly Is Aperture in Photography?
In the realm of photography, aperture is a vital concept to grasp as it is directly involved in creating captivating and high-quality photos. Let's dissect the term and its importance in the field of photography:
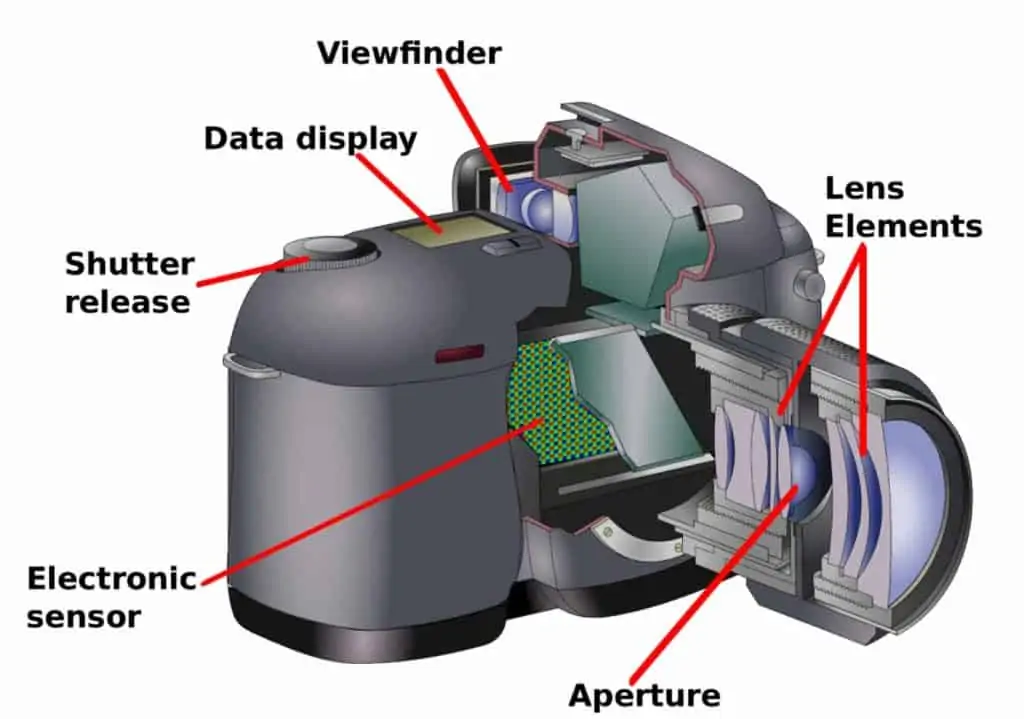
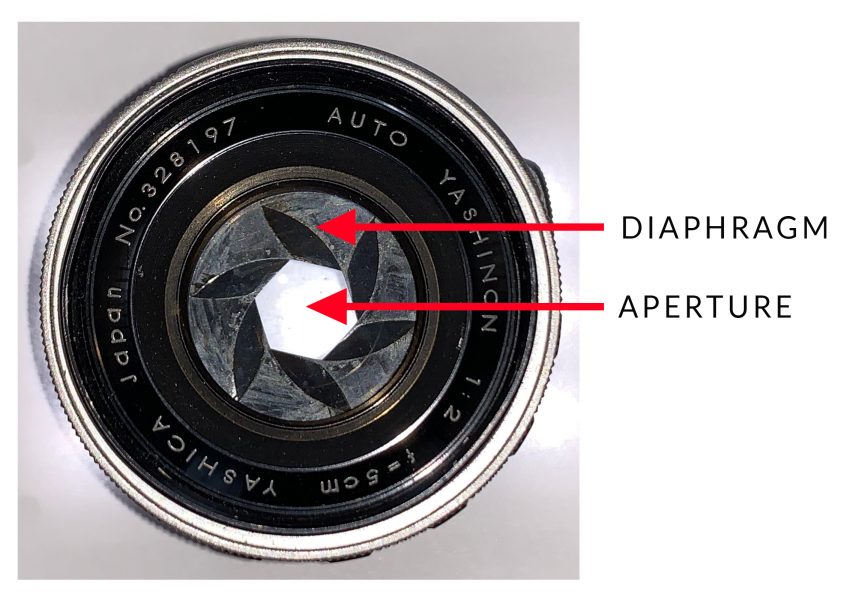
- Definition: At its core, the aperture is the opening within a camera lens responsible for controlling the volume of light that makes its way to the sensor.
- Size Variations: This opening or aperture is a dynamic factor, meaning its size – whether wide or narrow – can be adjusted based on the amount of light needed for the image. When the aperture is wider, more light filters through, thus leading to brighter images, and the inverse is apparent with a narrower aperture.
- Counted in F-stops: The aperture settings are represented in terms known as 'f-stops.'
- Impact on Image: The aperture settings are instrumental in shaping a photograph’s overall aesthetic. It influences two key facets - the brightness of the image, which is essentially the exposure, and the degree of sharpness across the length of the photo, known as the depth of field.
Next, we'll delve into how the aperture functions in a camera and how it can significantly infuse more creativity into your photography.
How Does the Aperture Function in a Camera?
The functionality of the aperture within any camera is analogous to a human eye's pupil. It's responsible for controlling the quantity of light that enters the camera. Upon half-pressing the shutter button on the camera, the aperture values are determined depending on the scene's light conditions and the selected mode. Here's a simplified step-by-step look at the process:
1. Initiation: The process begins when you lightly press your camera's shutter button.
2. Light Measurement: The camera measures the amount of light within the scene.
3. Mode-dependent Aperture Adjustment: Depending on the mode you have selected (automatic or manual), the aperture adjusts its size.
- Automatic mode: In this mode, the aperture's adjustment is managed by the camera's algorithm-based software.
- Manual mode: In this mode, you, as the photographer, have direct control over the aperture size.
4. Capture: The light passing through the aperture reaches the sensor, leading to the capturing of the image as per the aperture settings.
Using and understanding this primary camera control is a significant part of the photographer's journey towards honing expert photography skills.
Consider the following stats to demonstrate the importance of aperture control:
- According to a study, approximately 80% of professional photographers prefer using aperture-priority mode or manual mode due to the versatility these offer for creative shooting.
- It has been noted that mastering depth of field and exposure control through aperture understanding can potentially improve image composition by up to 60%.
Thus, understanding how the aperture functions on a camera and how to control it is an essential skill for every photographer.
How Does Aperture Impact Exposure and Depth of Field?
The aperture in a camera holds a significant role in defining exposure and depth of field in a photograph and thereby shaping its overall aesthetic appeal. For a clearer understanding, we've dissected how this crucial element affects these two vital aspects:

The effect on Exposure:
Exposure pertains to the brightness or darkness of your image - largely influenced by the aperture setting.
- Large Apertures: Aperture settings like f/2 relate to large openings. It permits more light to enter the camera, thus generating brighter images. This factor becomes quite essential while photographing in dim lit environments.
- Small Apertures: In contrast, an aperture setting like f/16 indicates a smaller opening. Fewer light rays can enter, leading to darker images. This technique is useful when the scene is overwhelmingly bright and the image would otherwise end up overexposed.

A key secret to professional photography undefyingly remains being able to adjust your aperture according to the lighting conditions of your scene.
The impact on Depth of Field:
Depth of Field (DoF) refers to the span between the nearest and the furthest objects that appear sharp in a photograph. It can be altered significantly by modifying the aperture.
- Shallow DoF: Images shot with higher aperture settings (e.g., f/2) produce a shallow depth of field. This results in a sharp focus on the subject while giving a beautiful, blurry (bokeh) effect to the backdrop—a popular technique in portrait photography.
- Greater DoF: Smaller aperture settings like f/16 offer a larger depth of field. This means a larger part of the image front-to-back will remain in focus. Landscape photographers often apply this approach to capture clear, widespread scenes.
In conclusion, understanding the appropriate usage of aperture for achieving optimal exposure and desirable depth of field remains imperative for photographers. While the intricacies may seem intimidating at first, with continuous experimentation and practice, you'll master using this parameter effectively in no time.
What is the Relationship Between Aperture and F-Stops?
The link between aperture and F-stops may initially seem perplexing, especially as their relationship seems counterintuitive. The underlying concept here is that F-stops are used to quantify the aperture in a camera lens. To enhance your comprehension of this subject, here are some essential points to note:
- F-stop Values: The term "F-stop" is what we use to define the measurements of a camera's aperture.
- Inverse Correlation: Interestingly, a lower F-stop number, such as f/1.8, refers to a larger aperture. This larger aperture allows a higher amount of light to enter the camera, creating brighter photographs.
- Larger F-stop Numbers: Contrarily, when we see a larger F-stop number, like f/16 for example, it means that the aperture is smaller. This small aperture allows less light into the camera, resulting in a darker image.
- F-stop Sequence: The sequence of F-stop numbers is named as full f-stops. This sequence plays a crucial part in maintaining balanced exposure and achieving the desired perception of depth in your photographs.
In conclusion, understanding the relationship between F-Stops and aperture is paramount for controlling the exposure of the image. Though it may sound contradictory at first, with time and experience, this understanding will become second nature to you.
Practical Tips: How to Choose the Right Aperture Settings for Your Photos?
Making the correct choice in aperture settings depends on factors such as exposure and depth of field. Here are some helpful tips to guide you:
1. Shooting in a Low-Light Environment: Utilize a wider aperture. This allows more light into the lens and brightens the image. Wider apertures are denoted by lower f-stop numbers, like f/1.4 or f/2.8.
2. Portraiture: Aim for a large aperture to achieve a shallow depth of field. This keeps your subject sharp while blurring out the distractions in the background for a professional-quality shot. Some commonly used apertures for portraits range from f/1.4 to f/2.8.
3. Landscape Photography: To capture an expansive scene like landscapes, consider using a small aperture for a deep depth of field. This means more parts of the image, from foreground to background, are in sharp focus. Suitable apertures for landscape photography usually include f/8, f/11, or higher.
4. Experimentation: Frequently adjusting your aperture settings will build your familiarity. Experiment with different f-stops and observe the changes in exposure and depth of field. By testing different settings, you'll discover how these adjustments affect your end photo.
5. Use Aperture Priority Mode: If you're not ready for fully manual mode, use the Aperture Priority Mode (marked "Av" or "A" on your camera mode dial). This mode allows you to manually set the aperture while the camera automatically adjusts the shutter speed for correct exposure.
Understanding these points will significantly improve your ability to select the most suitable aperture settings for your shots.
Conclusion
Understanding aperture, how to control it, and how it influences your photos is key to creating professional-quality images. It dictates the level of light in the scene and the depth of field, putting the creative control at your fingertips. With practice and experimentation, you will soon be able to instinctively choose the right aperture settings for any situation.
Related FAQs about what is aperture on a camera
Is a lower aperture better in photography?
The 'better' aperture depends on the scenario and your desired outcome. Lower apertures (like f/1.8) provide more light, resulting in brighter images, useful in low-light conditions. They also yield a shallow depth of field, ideal for portraits - it will focus sharply on a subject while blurring the background.
How does aperture affect the image quality?
Aperture significantly impacts image quality, particularly brightness, and sharpness. Wide apertures (low f-stop numbers) let more light in for brighter images but provide a shallow depth of field. Narrow apertures (high f-stop numbers) deliver darker, but sharper images with a deeper depth of field.
Can I manually control the aperture on my digital camera?
Yes, most digital cameras allow manual control of the aperture. You can either use Aperture Priority mode where you set the aperture and the camera automatically sets shutter speed, or full Manual mode for complete control over both aperture and shutter speed.


